Split a worksheet into pages Leave feedback
On this page
Spreadsheet document, also known as a workbook, is basically a set of worksheets, represented as tabs in most table processing software like Microsoft Excel. Some spreadsheet formats may have only a single worksheet; this includes, for example, all text-based separator-delimited formats (CSV, TSV etc.).
Size (dimensions) of a worksheet may be big, and even huge. For example, the now obsolete XLS format supports max 256 columns and 65536 rows. The newer XLSX (Office Open XML Workbook) format and the Microsoft Excel both support up to 16384 columns and 1048576 rows.
On the other hand, the principle of the GroupDocs.Viewer is to render (convert) input document formats (including the Spreadsheet documents) to the pages, where the page may be defined as a rectangular area of relatively small size, comparable to the area of display, or A4 paper. And here a potentially huge worksheet size has a conflict with relatively small page size. How to display a worksheet with 1 million rows on a single page? Maybe split it on several pages, but if yes, then how? This question has no single direct answer, there are different ways to solve that, and this article explains all the ways available using the GroupDocs.Viewer.
The most simple way — render the content of the whole worksheet on a single page, where page size will be adjusted to fit the whole amount of rows and columns. This is a good choice when it is already known that the worksheet has a small size. However, if a worksheet is really big, this approach may lead to awful results. In particular, when rendering to the HTML format, the resultant HTML document may be huge, tens or even hundreds of MiB, which may cause troubles while viewing such big files in the web-browsers. When rendering to the JPEG format, things may be even worse if the width or height will overcome the max limit of 65535 pixels. So use this mode deliberately.
For displaying a whole worksheet in one page call the SpreadsheetOptions.ForOnePagePerSheet static method, which returns an instance of the SpreadsheetOptions, already tuned for this. Then assign this instance to the ViewOptions.SpreadsheetOptions property and view the spreadsheet using this view options instance.
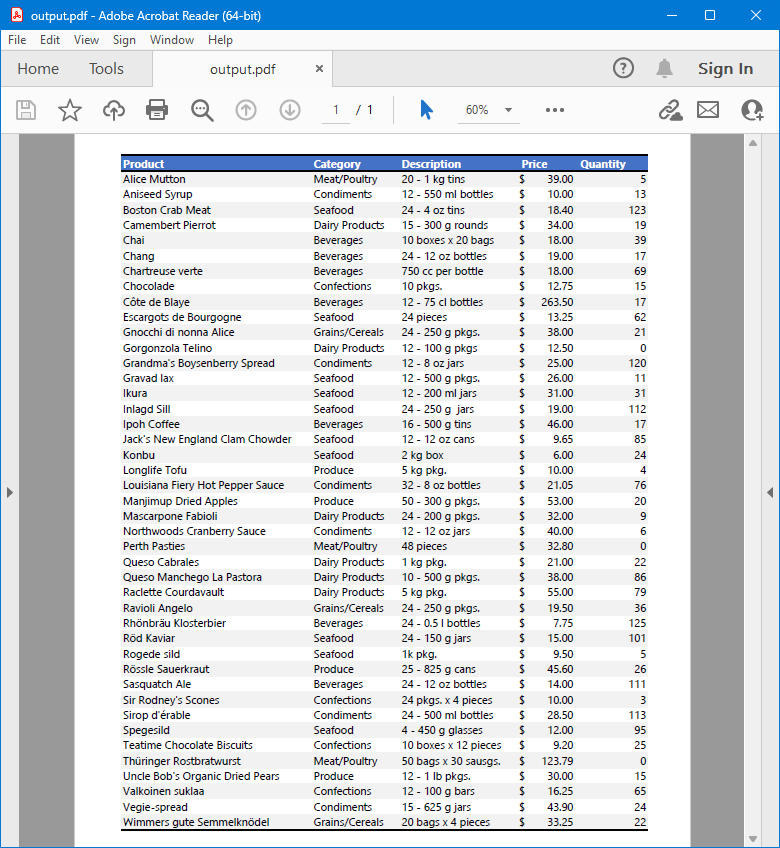
The following example takes a spreadsheet on input, and converts it to the resultant PDF file, where every worksheet from input XLSX is rendered to one page in output PDF.
using GroupDocs.Viewer;
using GroupDocs.Viewer.Options;
// ...

// Create PDF view options for rendering to PDF
PdfViewOptions viewOptions = new PdfViewOptions("output.pdf");

// Create spreadsheet options to render each worksheet to one page
viewOptions.SpreadsheetOptions = SpreadsheetOptions.ForOnePagePerSheet();

// Create a Viewer instance and specify the input XLSX
using (Viewer viewer = new Viewer("Products.xlsx"))
{
    // Render the XLSX to PDF
    viewer.View(viewOptions);
}
Imports GroupDocs.Viewer
Imports GroupDocs.Viewer.Options
' ...

' Create PDF view options for rendering to PDF
Dim viewOptions As New PdfViewOptions("output.pdf")

' Create spreadsheet options to render each worksheet to one page
viewOptions.SpreadsheetOptions = SpreadsheetOptions.ForOnePagePerSheet()

' Create a Viewer instance and specify the input XLSX
Using viewer As New Viewer("Products.xlsx")
    ' Render the XLSX to PDF
    viewer.View(viewOptions)
End Using
The screenshot below illustrates the result. The output PDF file contains one page (because input XLSX has one worksheet) that displays all worksheet data.
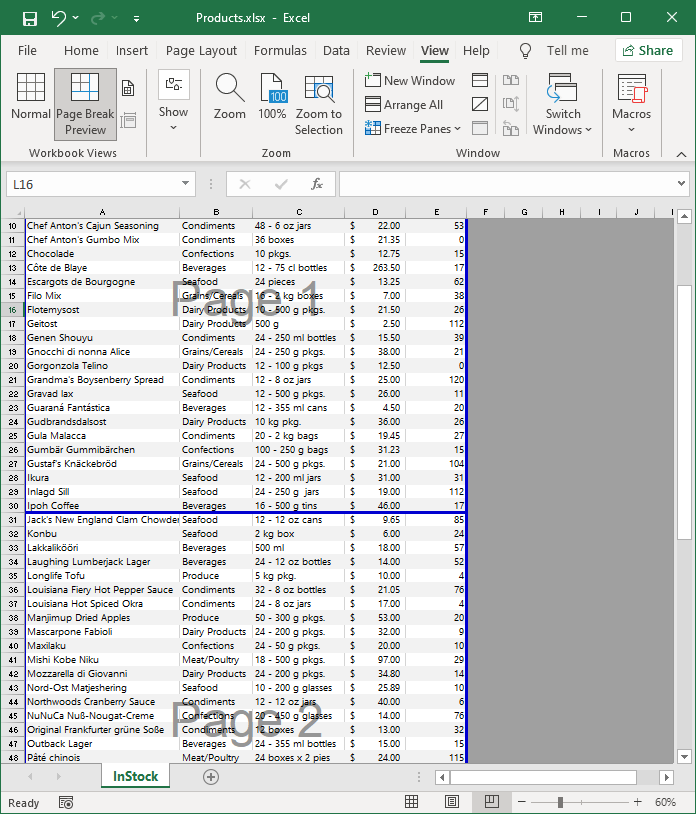
Microsoft Excel itself adds automatic page breaks based on paper size and page settings, such as orientation and margins. If you switch to the “View” tab and enter the “Page Break Preview” mode, you can see blue lines that divide the whole worksheet area on rectangular chunks, each of them is labeled as “Page 1”, “Page 2”, and so on. This is how Microsoft Excel “suggests” to split a worksheet onto pages.
In the image below, the vertical page break is inserted after the column “E”, and the horizontal page break is located under the row “30”. If you go to the “Page Layout” tab, and then change the values of “Orientation” and/or “Size” tiles, you can see how Microsoft Excel will recalculate page areas on the fly.
For achieving the same behavior with GroupDocs.Viewer call the SpreadsheetOptions.ForRenderingByPageBreaks static method, and then assign its value to the ViewOptions.SpreadsheetOptions property, as in the first example. The following code example shows this:
using GroupDocs.Viewer;
using GroupDocs.Viewer.Options;
// ...

// Create PDF view options for rendering to PDF
PdfViewOptions viewOptions = new PdfViewOptions("output.pdf");

// Create spreadsheet options to split worksheet onto pages by page breaks
viewOptions.SpreadsheetOptions = SpreadsheetOptions.ForRenderingByPageBreaks();

// Create a Viewer instance and specify the input XLSX
using (Viewer viewer = new Viewer("Products.xlsx"))
{
    // Render the XLSX to PDF
    viewer.View(viewOptions);
}
Imports GroupDocs.Viewer
Imports GroupDocs.Viewer.Options
' ...

' Create PDF view options for rendering to PDF
Dim viewOptions As New PdfViewOptions("output.pdf")

' Create spreadsheet options to split worksheet onto pages by page breaks
viewOptions.SpreadsheetOptions = SpreadsheetOptions.ForRenderingByPageBreaks()

' Create a Viewer instance and specify the input XLSX
Using viewer As New Viewer("Products.xlsx")
    ' Render the XLSX to PDF
    viewer.View(viewOptions)
End Using
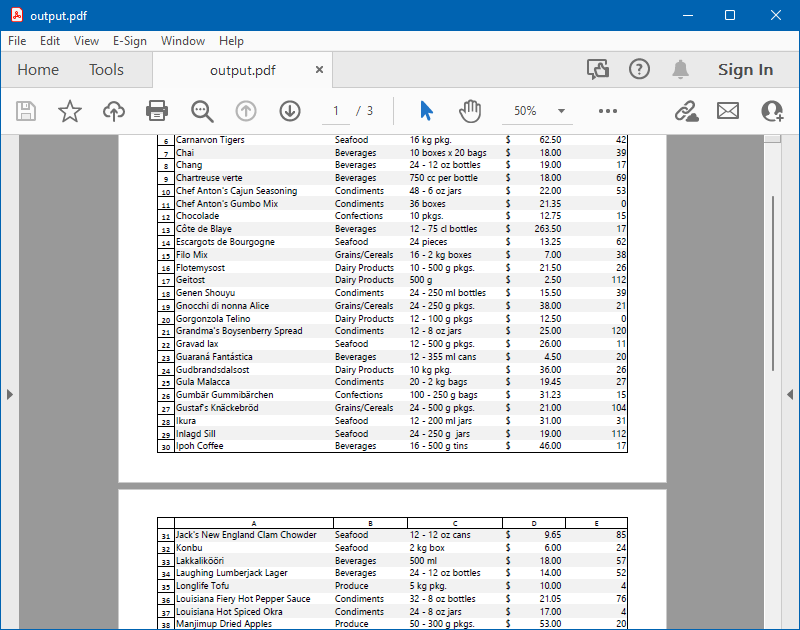
The image below illustrates the result — you can compare it with a screenshot above and note that worksheet content is splitted exactly as Microsoft Excel suggests.
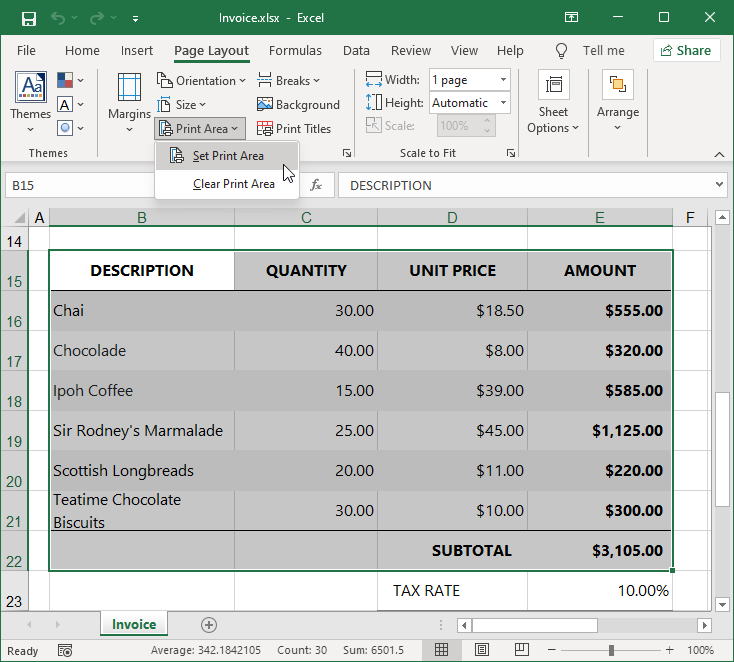
Along with the page breaks, the Microsoft Excel has a “Print Area” concept. Print Area is actually one or more cell ranges in a worksheet, which are designated for printing, while any content outside of the Print Area will not be printed at all. For adding some cell range to the Print Area, go to the “Page Layout" tab, click on the “Print Area” button and then click on “Set Print Area” item (see screenshot below). In order to add another cell range to the Print Area, select this new range, click on the “Print Area” button and then click on “Add to Print Area” item at this time. In the “Page Break Preview” mode you can see all cell ranges in the Print Area.
GroupDocs.Viewer also supports this option — in that case each cell range within the print area will be placed on a separate page. For achieving this call the SpreadsheetOptions.ForRenderingPrintArea static method and assign the returned SpreadsheetOptions instance to the ViewOptions.SpreadsheetOptions property. The following example shows how to do this.
using GroupDocs.Viewer;
using GroupDocs.Viewer.Options;
// ...

// Create PDF view options for rendering to PDF
PdfViewOptions viewOptions = new PdfViewOptions("output.pdf");

// Create spreadsheet options to render a Print Area only
viewOptions.SpreadsheetOptions = SpreadsheetOptions.ForRenderingPrintArea();

// Create a Viewer instance and specify the input XLSX
using (Viewer viewer = new Viewer("Invoice.xlsx"))
{
    // Render the XLSX to PDF
    viewer.View(viewOptions);
}
Imports GroupDocs.Viewer
Imports GroupDocs.Viewer.Options
' ...

' Create PDF view options for rendering to PDF
Dim viewOptions As New PdfViewOptions("output.pdf")

' Create spreadsheet options to render a Print Area only
viewOptions.SpreadsheetOptions = SpreadsheetOptions.ForRenderingPrintArea()

' Create a Viewer instance and specify the input XLSX
Using viewer As New Viewer("Invoice.xlsx")
    ' Render the XLSX to PDF
    viewer.View(viewOptions)
End Using
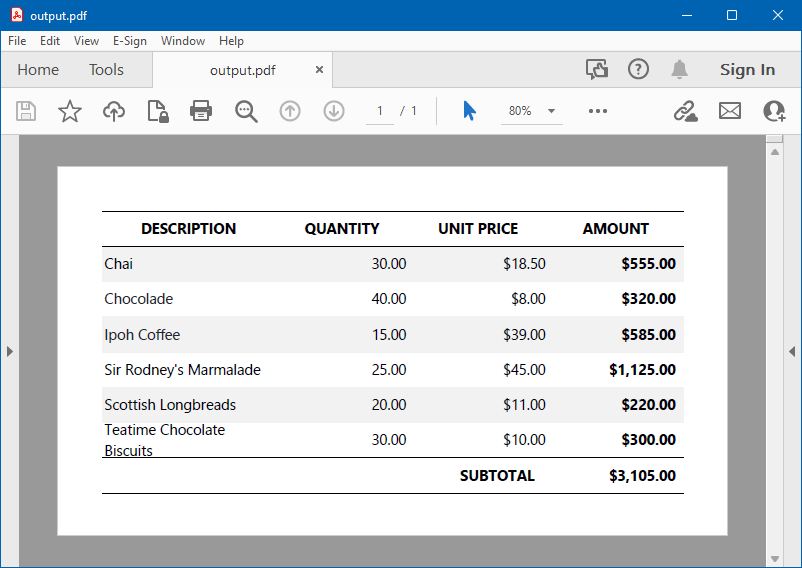
The image below illustrates the result.
GroupDocs.Viewer has a unique feature — combining the Print Area and page breaks in the single mode. In this case GroupDocs.Viewer takes into account all cell ranges of print area and page breaks in the worksheet and applies them simultaneously to split a worksheet onto pages.
For doing that call the SpreadsheetOptions.ForRenderingPrintAreaAndPageBreaks static method and assign the returned SpreadsheetOptions instance to the ViewOptions.SpreadsheetOptions property.
In the following screenshot the red line shows the print area, and the blue line shows page breaks.
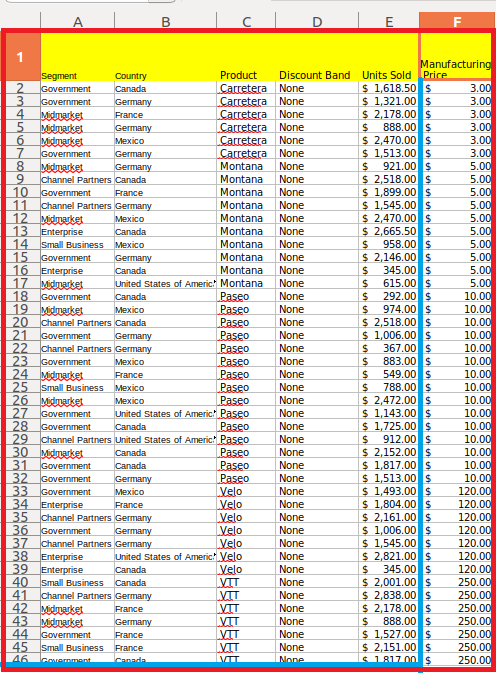
The following example renders the Microsoft Excel spreadsheet using page breaks and print areas displayed in the screenshot above to PDF:
using GroupDocs.Viewer;
using GroupDocs.Viewer.Options;
// ...

// Create PDF view options for rendering to PDF
PdfViewOptions viewOptions = new PdfViewOptions("Financial Sample.pdf");

// Render a Print Area and split by page breaks
viewOptions.SpreadsheetOptions = SpreadsheetOptions.ForRenderingPrintAreaAndPageBreaks();

// Create a Viewer instance and specify the input XLSX
using (Viewer viewer = new Viewer("Products.xlsx"))
{
    // Render the XLSX to PDF
    viewer.View(viewOptions);
}
Imports GroupDocs.Viewer
Imports GroupDocs.Viewer.Options
' ...

' Create PDF view options for rendering to PDF
Dim viewOptions As New PdfViewOptions("Financial Sample.pdf")

' Render a Print Area and split by page breaks
viewOptions.SpreadsheetOptions = SpreadsheetOptions.ForRenderingPrintAreaAndPageBreaks()

' Create a Viewer instance and specify the input XLSX
Using viewer As New Viewer("Products.xlsx")
    ' Render the XLSX to PDF
    viewer.View(viewOptions)
End Using
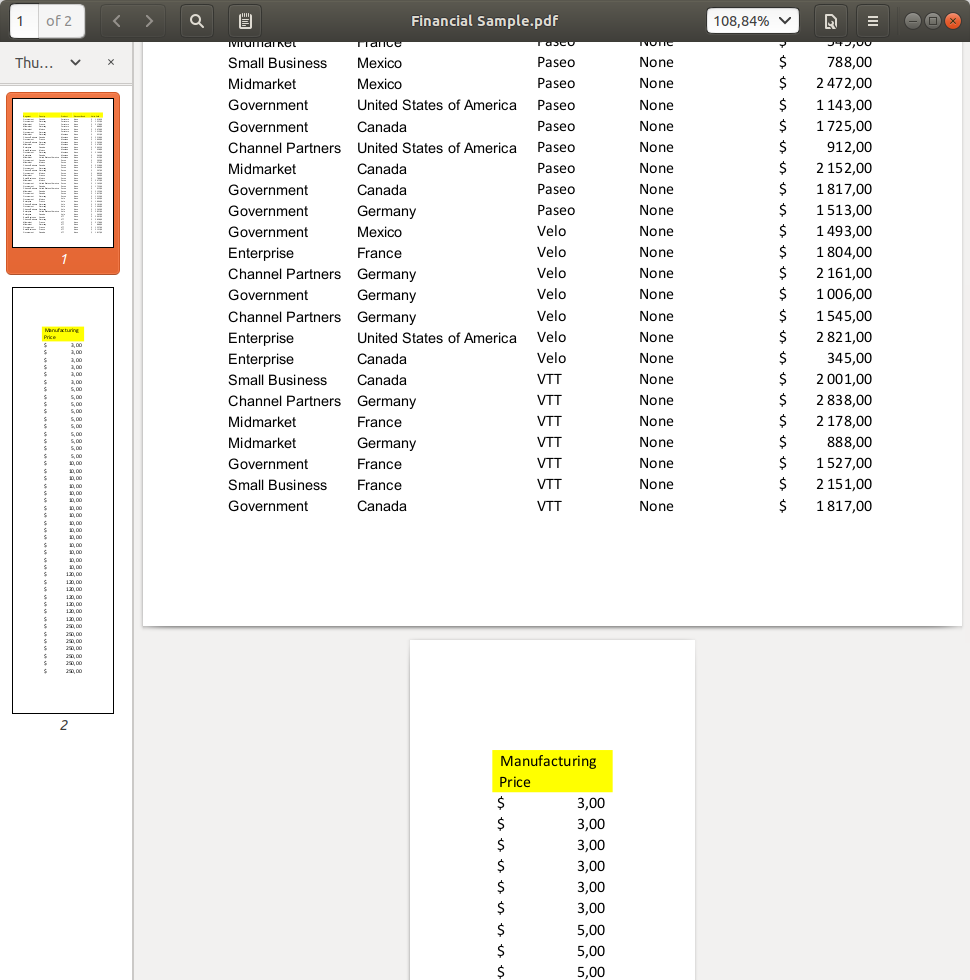
The screenshot below illustrates the result:
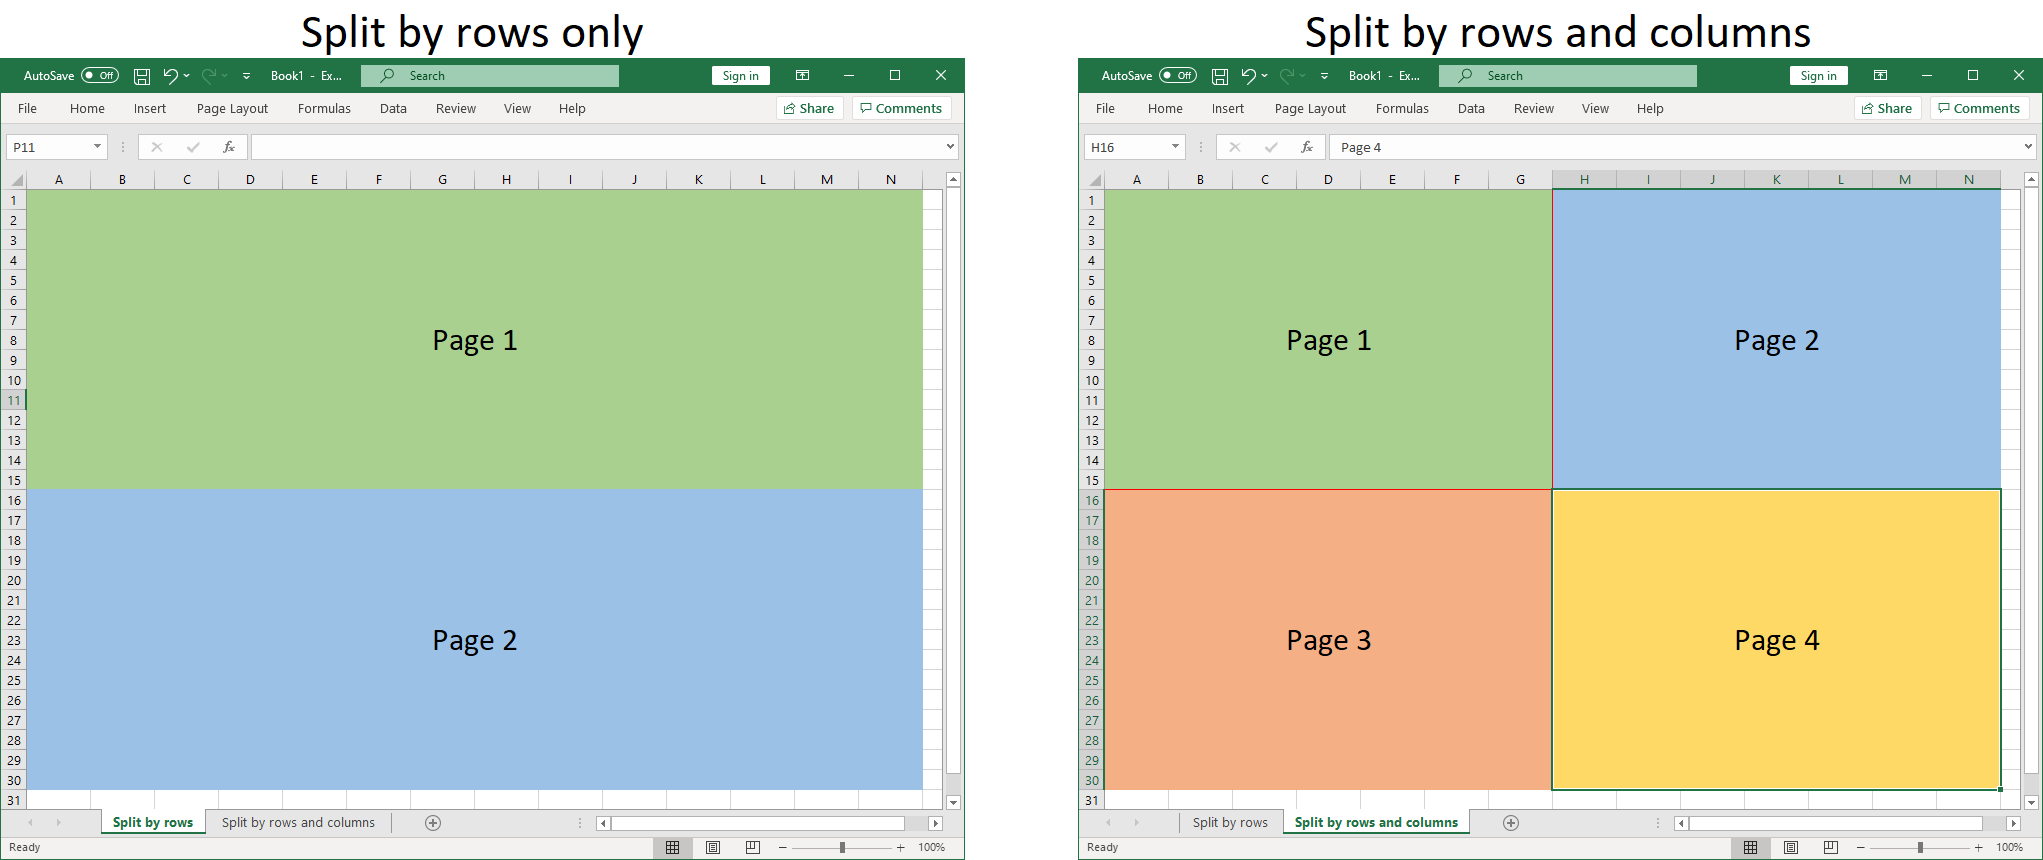
Sometimes none of the splitting methods, described above, is acceptable, or the spreadsheet has a format that does not support page breaks and Print Areas, for example, the text-based CSV. For such cases GroupDocs.Viewer allows to manually specify the number of rows and/or number of columns that should be present on every page. In short, the difference between splitting by rows only vs. splitting by rows and columns is illustrated on screenshot below.
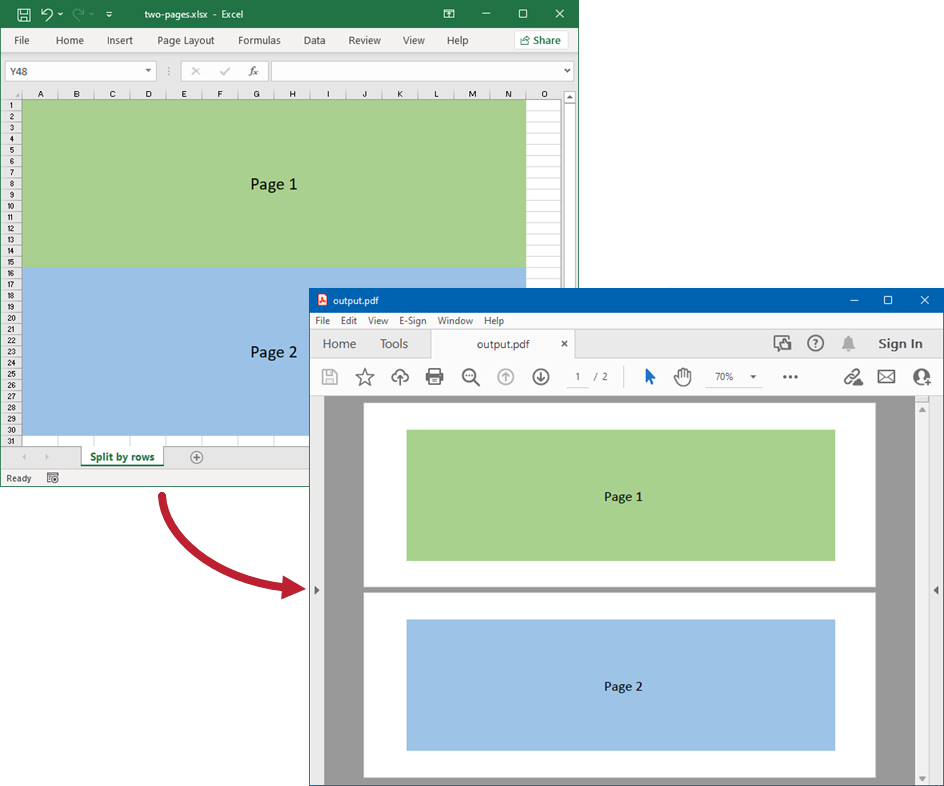
When a worksheet is tall, but narrow, i.e. it has some moderate amount of columns, but huge amount of rows, it is ideal to split such a worksheet horizontally, by rows. In this case the user should specify a number of rows per single page in the SpreadsheetOptions.ForSplitSheetIntoPages(int countRowsPerPage) static method, and then all as usual. The number of rows per page must be strictly greater than zero. The code sample is below, it specifies 15 rows per one page. This code sample uses a file “two-pages.xlsx”, that can be downloaded here.
using GroupDocs.Viewer;
using GroupDocs.Viewer.Options;
// ...

// Create PDF view options for rendering to PDF
PdfViewOptions viewOptions = new PdfViewOptions("output.pdf");

// Specify number of rows for every page
int rowsPerPage = 15;

// Create spreadsheet options to split worksheet by number of rows
viewOptions.SpreadsheetOptions = SpreadsheetOptions.ForSplitSheetIntoPages(rowsPerPage);

// Create a Viewer instance and specify the input XLSX
using (Viewer viewer = new Viewer("two-pages.xlsx"))
{
    // Render the XLSX to PDF
    viewer.View(viewOptions);
}
Imports GroupDocs.Viewer
Imports GroupDocs.Viewer.Options
' ...

' Create PDF view options for rendering to PDF
Dim viewOptions As New PdfViewOptions("output.pdf")

' Specify number of rows for every page
Dim rowsPerPage As Int32 = 15

' Create spreadsheet options to split worksheet by number of rows
viewOptions.SpreadsheetOptions = SpreadsheetOptions.ForSplitSheetIntoPages(rowsPerPage)

' Create a Viewer instance and specify the input XLSX
Using viewer As New Viewer("two-pages.xlsx")
    ' Render the XLSX to PDF
    viewer.View(viewOptions)
End Using
The screenshot below demonstrates the original XLSX spreadsheet, conditionally divided onto chucks with 15 rows in each, and output PDF file, produced by the GroupDocs.Viewer.
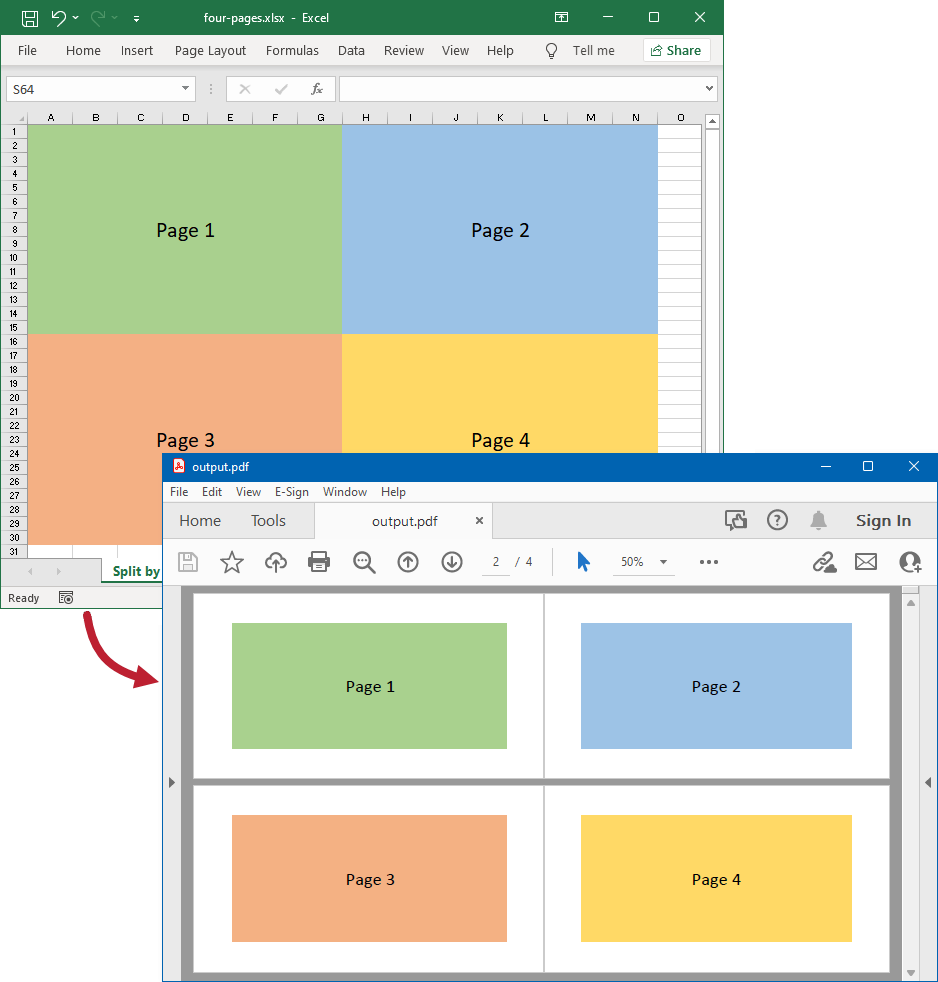
When a worksheet is tall and wide, i.e. it has a big amount of columns and rows, then need to split such a worksheet horizontally and vertically simultaneously. The previously mentioned ForSplitSheetIntoPages static method has an overload, that obtained two arguments — number of rows and number of columns: ForSplitSheetIntoPages(int countRowsPerPage, int countColumnsPerPage). The number of rows and columns per page must be strictly greater than zero. The following sample demonstrates splitting the worksheets into pages with 15 rows and 7 columns per each. This code sample uses a file “four-pages.xlsx”, that can be downloaded here.
using GroupDocs.Viewer;
using GroupDocs.Viewer.Options;
// ...

// Create PDF view options for rendering to PDF
PdfViewOptions viewOptions = new PdfViewOptions("output.pdf");

// Specify number of rows and columns for every page
int rowsPerPage = 15;
int columnsPerPage = 7;

// Create spreadsheet options to split worksheet by number of rows and columns
viewOptions.SpreadsheetOptions = SpreadsheetOptions.ForSplitSheetIntoPages(rowsPerPage, columnsPerPage);

// Create a Viewer instance and specify the input XLSX
using (Viewer viewer = new Viewer("four-pages.xlsx"))
{
    // Render the XLSX to PDF
    viewer.View(viewOptions);
}
Imports GroupDocs.Viewer
Imports GroupDocs.Viewer.Options
' ...

' Create PDF view options for rendering to PDF
Dim viewOptions As New PdfViewOptions("output.pdf")

' Specify number of rows and columns for every page
Dim rowsPerPage As Int32 = 15
Dim columnsPerPage As Int32 = 7

' Create spreadsheet options to split worksheet by number of rows and columns
viewOptions.SpreadsheetOptions = SpreadsheetOptions.ForSplitSheetIntoPages(rowsPerPage, columnsPerPage)

' Create a Viewer instance and specify the input XLSX
Using viewer As New Viewer("four-pages.xlsx")
    ' Render the XLSX to PDF
    viewer.View(viewOptions)
End Using
The screenshot below demonstrates the original XLSX spreadsheet, conditionally divided onto chucks with 15 rows and 7 columns (A-G and H-N) in each, and output PDF file, produced by the GroupDocs.Viewer.
This article shows that GroupDocs.Viewer provides different ways to split a worksheet into pages in order to satisfy the widest variety of use-cases. Please note that all these features were added to the GroupDocs.Viewer gradually, piece by piece, so if you’re using some obsolete version of the library, released before year 2023, some of the described features may be missing. Also keep in mind that we’re open to new suggestions and ideas how a worksheet can be splitted on pages, so you are welcome to share your thoughts on our forum.
Was this page helpful?
Any additional feedback you'd like to share with us?
Please tell us how we can improve this page.
Thank you for your feedback!
We value your opinion. Your feedback will help us improve our documentation.

