Render archives as HTML, PDF, and image files Leave feedback
On this page
GroupDocs.Viewer for .NET allows to view the list of content of archive files and represent it in HTML, PDF, PNG and JPEG formats. It also allows to extract any arbitrary file from the archive. It does not require to use any third-party file archiver and/or compression software to display archive file contents within a .NET application (web or desktop).
Displaying a list of content of archive files in GroupDocs.Viewer is similar to other formats. You need to create an instance of the Viewer class, and specify an archive document in its constructor as a path to the file or a byte stream. Optionally, you can pass a load options, where a password for opening an encoded archive document can be specified. Then you need to select a desired output format, in which the archive content will be represented: HTML (HtmlViewOptions), PDF (PdfViewOptions), PNG (PngViewOptions), or JPEG (JpgViewOptions). Finally, call the Viewer.View() instance method to obtain a result.
GroupDocs.Viewer for .NET had support of archive formats from its very beginning. However, starting from the version 24.10 the archive processing module was completely reworked. In short, the way of displaying a list of entries from the archive was completely changed, as well as a final representation. Also, the performance was drastically improved. The public options are left the same, the only change in a public API is an ItemsPerPage property of ArchiveOptions class, which now is marked as obsolete because it has no effect now. This article explains and displays the new archive processing module. If you’re using the older versions of the GroupDocs.Viewer before the 24.10, the old version of this article can be found here.
GroupDocs.Viewer supports the following archive file formats:
- .7Z (7-Zip Compressed File)
- .BZ2 (Bzip2 Compressed File)
- .GZ (Gnu Zipped Archive)
- .RAR (WinRAR Compressed Archive)
- .TAR (Consolidated Unix File Archive)
- .TGZ / .TAR.GZ (Gzipped Tar File)
- .TXZ / .TAR.XZ (XZ Compressed Tar Archive)
- .XZ (XZ Compressed Archive)
- .ZIP (Zipped File)
- .ZST / .TAR.ZST / .TZST (Zstandard)
- .ISO (Optical Disk Image ISO-9660)
- .LHA / .LZH (archive file format)
- .CAB (Cabinet)
- .WIM (Windows Imaging Format file)
GroupDocs.Viewer can detect the archive file format automatically based on information in the file header.
The 1st stage of document processing using the GroupDocs.Viewer is loading the document, and archives are not the exceptions. The simplest way is just to path the absolute or relative path of the archive file to the constructor of the Viewer class. If an archive document is represented as a stream, this stream can be specified in the overload of the constructor of the Viewer class as well, but make sure that this stream is readable (CanRead) and its position points to the correct place. Finally, if an archive is encoded and password-protected, and you know this password, it should be specified in the LoadOptions, or a GroupDocsViewerException exception will be thrown instead.
Code sample below shows loading of two archive files into two Viewer instances: 1st file is specified by path, while 2nd — by a stream and with load options with password.
using GroupDocs.Viewer;
using GroupDocs.Viewer.Options;
// ...

string inputArchivePath = "Archive.zip";
using (Viewer viewer1 = new Viewer(inputArchivePath))
{
    // view it
}

FileStream inputArchiveStream = File.OpenRead(inputArchivePath);

LoadOptions loadOptions = new LoadOptions();
loadOptions.Password = "password";

using (Viewer viewer2 = new Viewer(inputArchiveStream, loadOptions))
{
    // view it
}
Imports GroupDocs.Viewer
Imports GroupDocs.Viewer.Options
' ...

Dim inputArchivePath As String = "Archive.zip"
Using viewer1 As New Viewer(inputArchivePath)
    'view it
End Using

Dim inputArchiveStream As FileStream = File.OpenRead(inputArchivePath)

Dim loadOptions As LoadOptions = New LoadOptions()
loadOptions.Password = "password"

Using viewer2 As New Viewer(inputArchiveStream, loadOptions)
    'view it
End Using
After the archive document is loaded and an instance of the Viewer class is created, it can be viewed using a Viewer.View() instance method. The “viewing” means displaying a list of content, stored within an archive, in desired output format. In general, this is a tree view, with folders and files, stored within these folders, sorted by default Windows-based order. This means that within one folder all subfolders are located first, sorted in lexicographic order, followed by files, also sorted in lexicographic order. However, the GroupDocs.Viewer implements not a “pure” lexicographic order, but a Windows-like “natural” order, where “file10.txt” is located after the “file9.txt”, but not before it.
Like for all supported formats, GroupDocs.Viewer supports 4 output formats for the representation: HTML, PDF, PNG, and JPEG.
For saving the documents (including archives) to the HTML format the GroupDocs.Viewer provides a HtmlViewOptions class. There are two ways of creating an instance of this class: using either ForEmbeddedResources or ForExternalResources static methods. Usually, when the 1st method (ForEmbeddedResources) is used, all the resources (stylesheets, raster and vector images, and fonts) are stored inside the HTML markup in base64 encoding. When the 2nd method (ForExternalResources) is used, the HTML markup has only references to the resources, which are stored externally.
In the context of archive documents and their rendering to HTML format, the resultant HTML document, which contains a list of files and folders within the archive, contains only stylesheet and icons, representing the folder or format of the particular file, as SVG vector graphics. When saved with embedded resources, the stylesheet is placed in the STYLE element in the HTML -> HEAD section, while SVG images are located inside this stylesheet in base64 encoding. When saved with external resources, the stylesheet is also placed in the STYLE element in the HTML -> HEAD section, but it contains the references to the SVG images that are stored separately. Need to mention that the HTML document contains only those SVG icons, which are necessary for displaying the formats of only those files, which are present in the archive. For example, if a particular archive does not contain the PDF file(s), there will be no SVG icon, which represents the PDF format, in the HTML resources.
GroupDocs.Viewer by default produces paged HTML results — input documents are splitted on pages, and each page is represented by a separate HTML document. There is also a HtmlViewOptions.RenderToSinglePage boolean property (flag) in the HtmlViewOptions class — when enabled, the GroupDocs.Viewer produces a single HTML document for the whole input document with all its pages. But archives are pageless in their nature — they store files and folders, and have no concept of “pages” like PDF documents, for example. That’s why for any input archive document the GroupDocs.Viewer produces only a single output HTML document, and there is no matter which value has the RenderToSinglePage boolean flag.
Code example below shows rendering of the same input archive file to the two similar HTML documents: 1st with embedded resources, while 2nd — with external.
using GroupDocs.Viewer;
using GroupDocs.Viewer.Options;
// ...

HtmlViewOptions htmlEmbeddedOptions = HtmlViewOptions.ForEmbeddedResources("Embedded.html");
HtmlViewOptions htmlExternalOptions = HtmlViewOptions.ForExternalResources("External.html", "External_files/resource-{1}", "External_files/resource-{1}");

using (Viewer viewer = new Viewer("Archive.zip"))
{
    viewer.View(htmlEmbeddedOptions);
    viewer.View(htmlExternalOptions);
}
Imports GroupDocs.Viewer
Imports GroupDocs.Viewer.Options
' ...

Dim htmlEmbeddedOptions As HtmlViewOptions = HtmlViewOptions.ForEmbeddedResources("Embedded.html")
Dim htmlExternalOptions As HtmlViewOptions = HtmlViewOptions.ForExternalResources("External.html",
                        "External_files/resource-{1}", "External_files/resource-{1}")
Using viewer As New Viewer("Archive.zip")
    viewer.View(htmlEmbeddedOptions)
    viewer.View(htmlExternalOptions)
End Using
After running this code sample there will be created two HTML files in the output folder: “Embedded.html” and “External.html”. And for the second one, there will be an additional resource folder “External_files” with SVG files inside. Main HTML document will be connected to these SVG icons through relative URIs “External_files/resource-g.svg”, “External_files/resource-g1.svg”, “External_files/resource-g2.svg”, and so on.
Screenshot below shows how the output HTML document looks like in a web browser for the archive with a huge amount of files and folders and deep nesting level, when the GroupDocs.Viewer works in licensed mode. Take a note that the GroupDocs.Viewer displays a metadata for the files: a size in bytes and modification date. The modification date can be displayed not for all archive formats, but only for those, which support it.
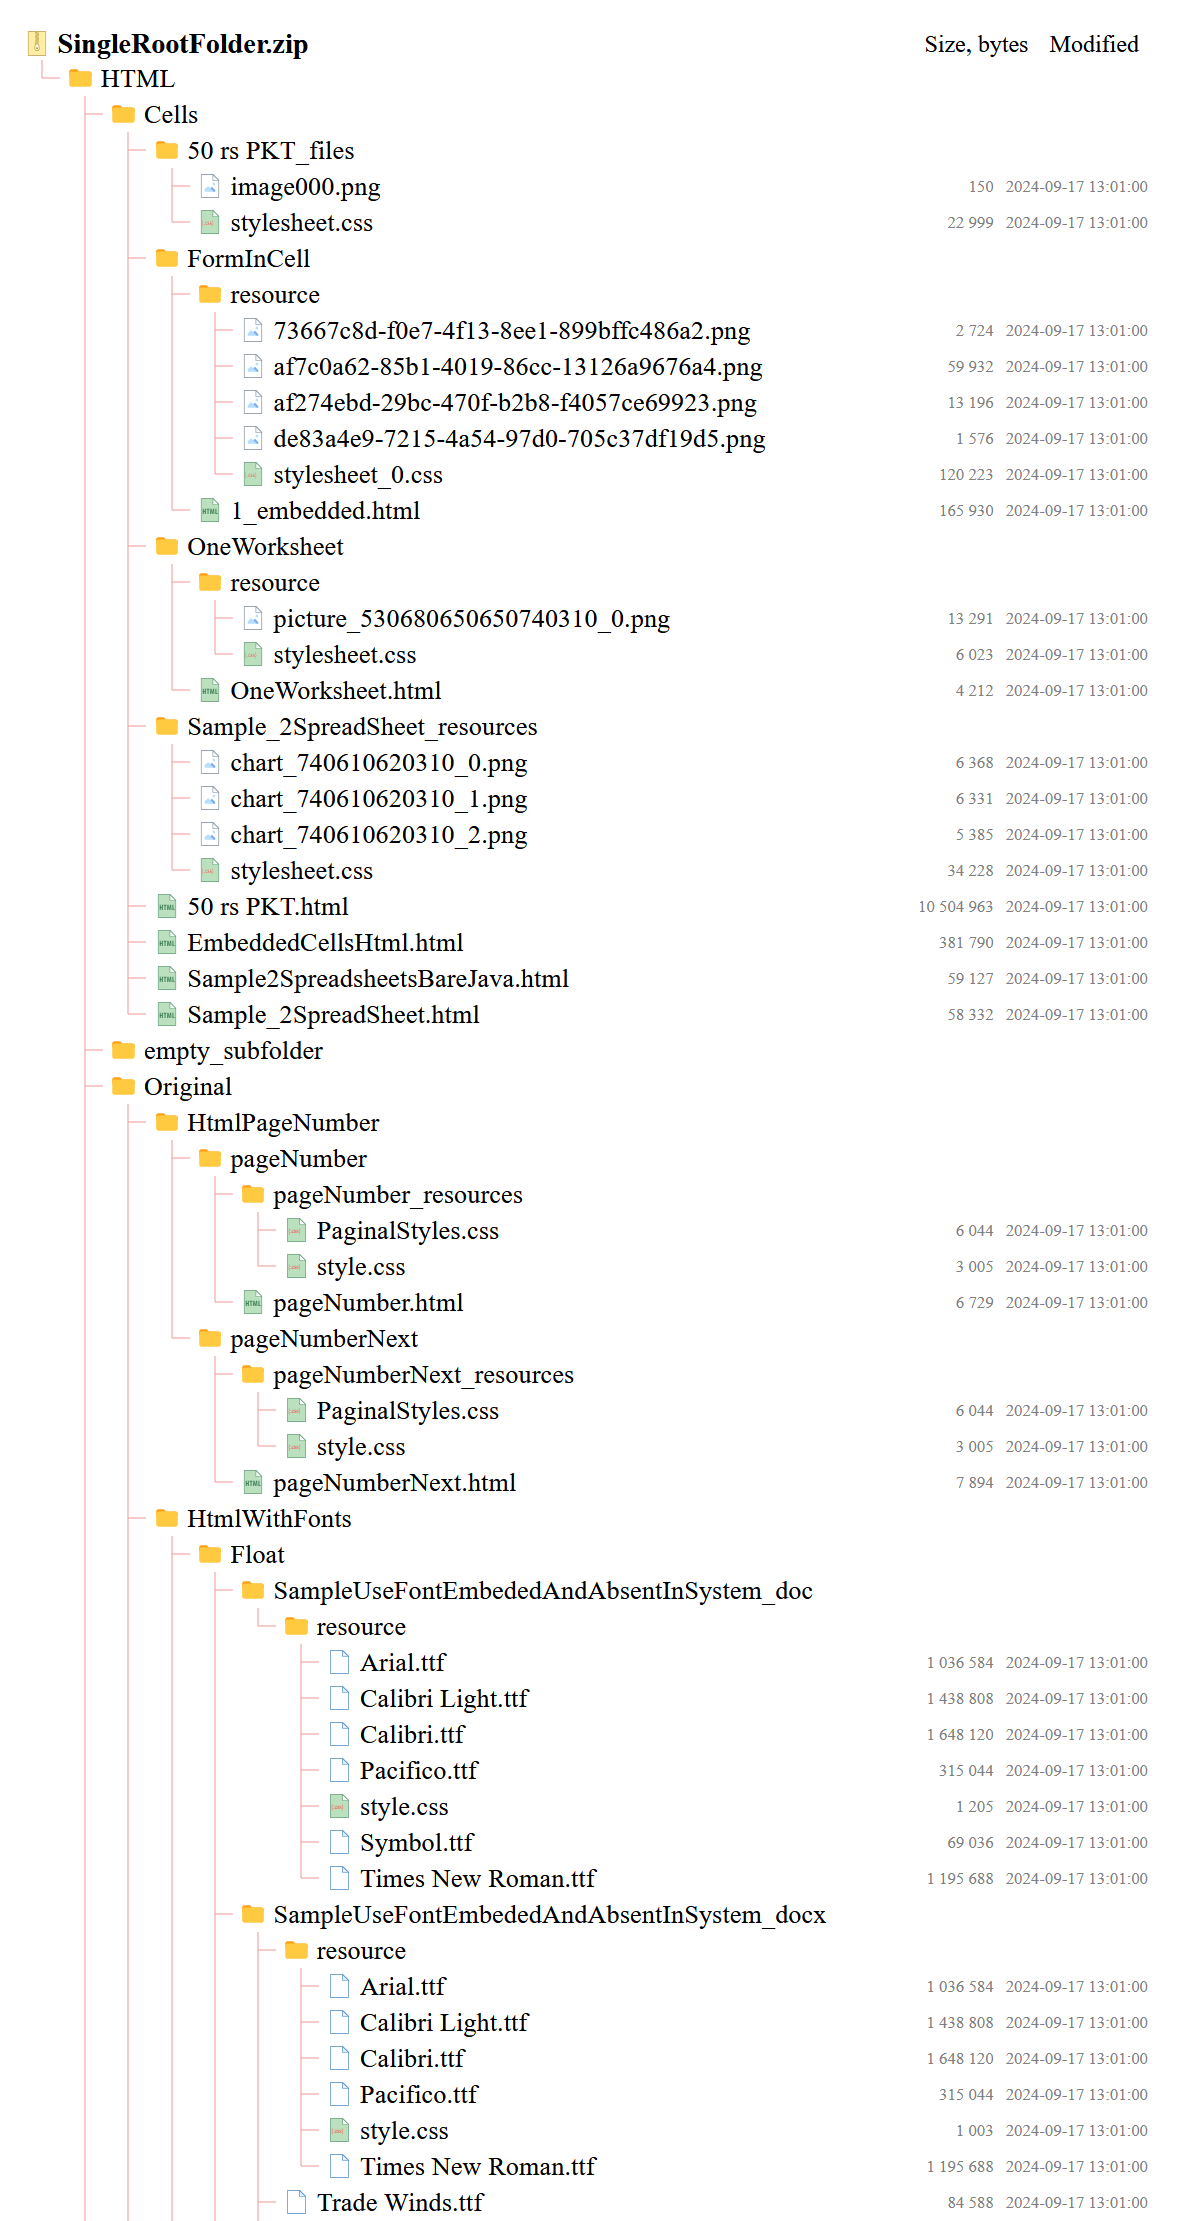
Also please note that for the archive documents the HTML rendering mode is the highest quality among all the others and also has the best performance.
PDF format by its nature has pages, so the list of files and folders from the archive is paginated when rendering to PDF format. Number of pages in this output PDF cannot be specified and it depends only on the number of entries (files and folders) within the input archive.
PdfViewOptions class must be used in order to render archive documents as PDF. All standard PDF-related operations like protecting, watermarking, reordering pages, tuning the images quality and size, can be applied to the output PDF document and are described in the article “Render to PDF” and its sub-articles.
Code example below shows how to display the list of content of a specified archive file in PDF format.
using GroupDocs.Viewer;
using GroupDocs.Viewer.Options;
// ...

PdfViewOptions pdfOptions = new PdfViewOptions("Output.pdf");

using (Viewer viewer = new Viewer("Archive.zip"))
{
    viewer.View(pdfOptions);
}
Imports GroupDocs.Viewer
Imports GroupDocs.Viewer.Options
' ...

Dim pdfOptions As PdfViewOptions = New PdfViewOptions("Output.pdf")
Using viewer As New Viewer("Archive.zip")
    viewer.View(pdfOptions)
End Using
Screenshot below shows how the output PDF looks like in a PDF Reader for the archive with a huge amount of files and folders and deep nesting level, when the GroupDocs.Viewer works in licensed mode. Take note how a list of entries is splitted on several pages.
PngViewOptions and JpgViewOptions are responsible for saving archives to the PNG and JPEG raster image formats respectively. Like for the PDF, if the list of archive content cannot fit into the area of one image, it will be paginated and spread across multiple images.
Size of the output images will be calculated automatically based on the specific archive and its content, but it is possible to change the image size using the Width, Height, MaxWidth, and MaxHeight properties of the PngViewOptions and JpgViewOptions classes. An article “Render to PNG or JPEG” describes the tuning and post-processing of PNG and JPEG images in detail.
Because one PNG or JPEG image may contain only the one “page”, for the archives with a significant number of folders and files there will be created several “pages” and thus produced several images. The constructors of the PngViewOptions and JpgViewOptions classes have overload, which allows to specify the template string for the output image files, and the GroupDocs.Viewer fills this template while saving with a sequential page number, which starts from “1”.
Code example below shows rendering of the same input archive file to the two folders with images: one folder with “PNG” name contains page images in PNG format, while another with “JPEG” name — in JPEG format. For both formats the same amount of “page-images” will be generated.
using GroupDocs.Viewer;
using GroupDocs.Viewer.Options;
// ...

string pngFolderPath = Directory.CreateDirectory("PNG").FullName;
string jpegFolderPath = Directory.CreateDirectory("JPEG").FullName;

PngViewOptions pngOptions = new PngViewOptions(Path.Combine(pngFolderPath, "page-{0}.png"));
JpgViewOptions jpegOptions = new JpgViewOptions(Path.Combine(jpegFolderPath, "page-{0}.jpeg"));

using (Viewer viewer = new Viewer("Archive.zip"))
{
    viewer.View(pngOptions);
    viewer.View(jpegOptions);
}
Imports GroupDocs.Viewer
Imports GroupDocs.Viewer.Options
' ...

Dim pngFolderPath As String = Directory.CreateDirectory("PNG").FullName
Dim jpegFolderPath As String = Directory.CreateDirectory("JPEG").FullName

Dim pngOptions As PngViewOptions = New PngViewOptions(Path.Combine(pngFolderPath, "page-{0}.png"))
Dim jpegOptions As PngViewOptions = New PngViewOptions(Path.Combine(jpegFolderPath, "page-{0}.jpeg"))

Using viewer As New Viewer("Archive.zip")
    viewer.View(pngOptions)
    viewer.View(jpegOptions)
End Using
All 4 option classes — HtmlViewOptions, PdfViewOptions, PngViewOptions, and JpgViewOptions — contain a ArchiveOptions property of the ArchiveOptions type. This class has two properties, which allow users to modify a rendering of the list of archive content and are described below.
By default the GroupDocs.Viewer displays all content inside the archive — all folders, subfolders and files with any nesting level till the end. However, in some cases it is required to display only a part of the list of archive content, for example, only content of some specific folder (including its subfolders), which is located in the given archive.
The Folder property of a System.String type allows to do that. It obtains a folder name or relative path, which is located inside the given archive, and if the archive truly contains such a folder — only its content will be displayed. Otherwise, if no folder with such name or path was found in the archive, the whole archive content will be listed, as usual.
When GroupDocs.Viewer renders a list of archive content, it displays the archive document name at the top of the output document, as a root node for all folders and files inside an archive. When an archive document is specified as a file, its filename will be used as the archive document name. If an archive document is specified as a stream, a standard template name will be used.
With the FileName property of the ArchiveOptions type it is possible to specify a displayed archive document name explicitly. Just create an instance of the FileName class, specify desired archive name in its constructor, and assign this instance to the ArchiveOptions.FileName property.
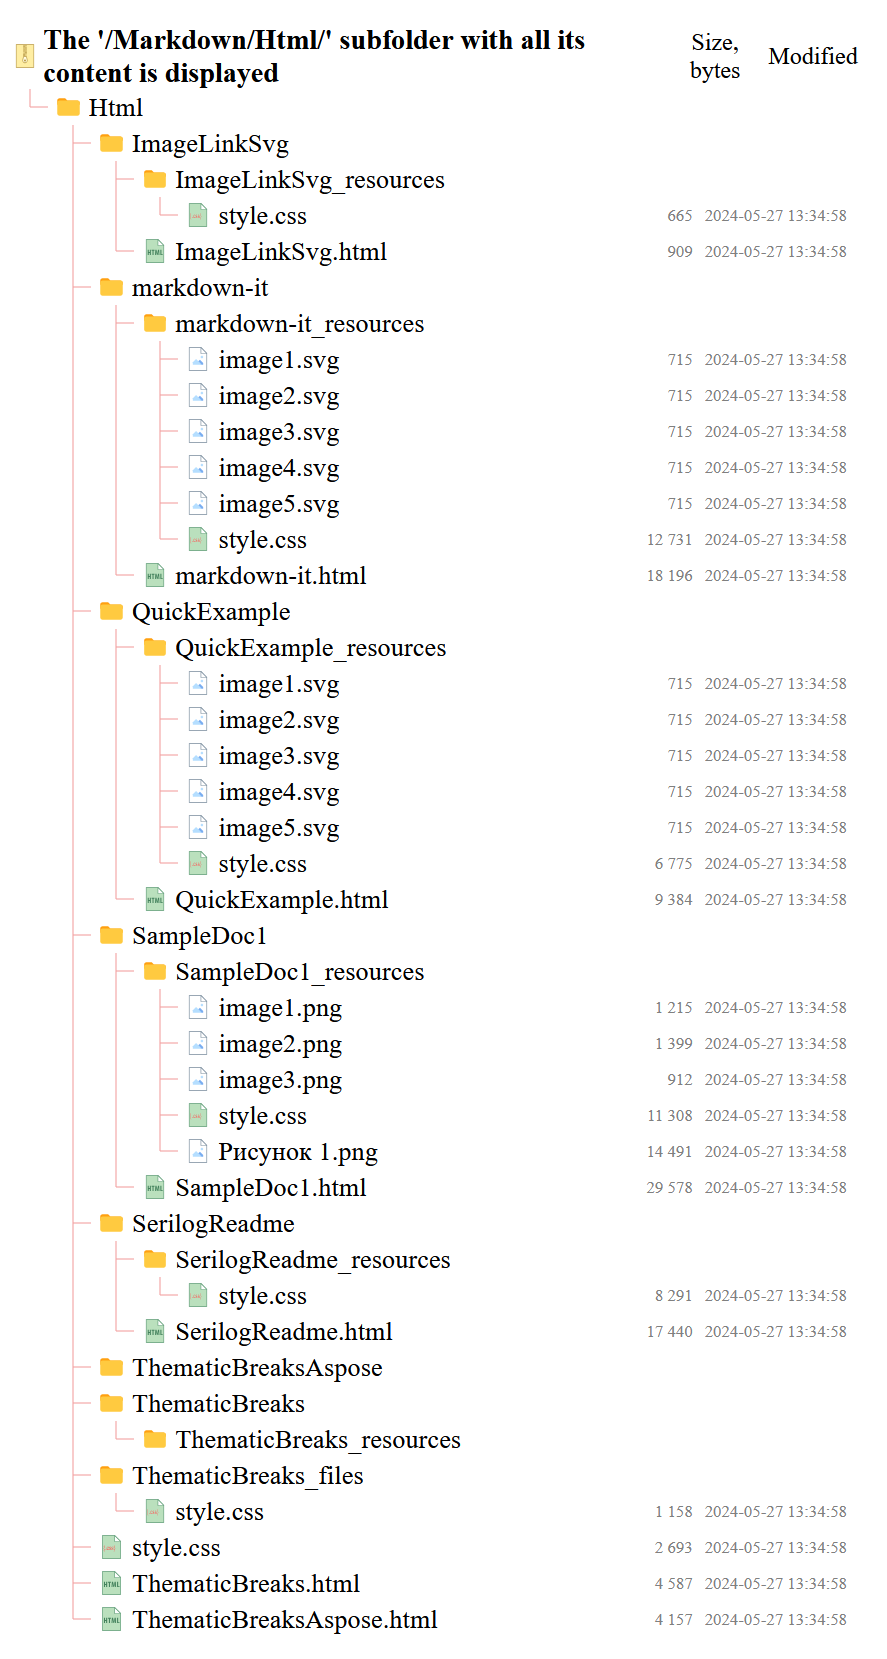
Code sample below shows using the Folder property and FileName property simultaneously for the same loaded archive file. Rendering is performed to the HTML format with embedded resources. It is assumed that a valid license is set.
using GroupDocs.Viewer;
using GroupDocs.Viewer.Options;
// ...

HtmlViewOptions htmlEmbeddedOptions = HtmlViewOptions.ForEmbeddedResources("FolderAndFileName.html");
htmlEmbeddedOptions.ArchiveOptions.Folder = "Markdown/Html";
htmlEmbeddedOptions.ArchiveOptions.FileName = new FileName("The '/Markdown/Html/' subfolder with all its content is displayed");

using (Viewer viewer = new Viewer("Archive.zip"))
{
    viewer.View(htmlEmbeddedOptions);
}
Imports GroupDocs.Viewer
Imports GroupDocs.Viewer.Options
' ...

Dim htmlEmbeddedOptions As HtmlViewOptions = HtmlViewOptions.ForEmbeddedResources("FolderAndFileName.html")
htmlEmbeddedOptions.ArchiveOptions.Folder = "Markdown/Html"
htmlEmbeddedOptions.ArchiveOptions.FileName =
    New FileName("The '/Markdown/Html/' subfolder with all its content is displayed")

Using viewer As New Viewer("Archive.zip")
    viewer.View(htmlEmbeddedOptions)
End Using
Despite code sample above shows using the Folder and FileName properties when displaying the archive content in HTML format, but these properties are working the same when displaying the archive content in all other formats — PDF, PNG, and JPEG.
Screenshot below shows the result of the code sample above.
While displaying a list of files and folders inside the archives is the main purpose of the GroupDocs.Viewer, it also allows to extract files from archives by their paths. In the GroupDocs.Viewer terminology the files inside archives are so-called “attachments”.
In general, the extracting of specific attachment (file) from the given archive document is made in the next steps:
- Create a
Viewerinstance and load an archive document into its constructor. UseLoadOptionsif necessary. - Get a list of all attachments (files), stored inside an archive, by calling a
Viewer.GetAttachments()parameterless method or its cancellable overload. - Find and select a particular
Attachmentinstance from the list, which you want to save. - Prepare a destination stream, into which you want to write the attachment. Make sure that this stream is not null and is writable (
CanWrite) and seekable (CanSeek). - Write the previously selected attachment to a prepared stream using the
Viewer.SaveAttachment(Attachment, System.IO.Stream)method or its cancellable overload. - Alternatively, if you want to extract and save all files from the given archive, just iterate over the list of attachments and call a
Viewer.SaveAttachment()method for every attachment in a step.
Take note that extracting files from the archive and viewing its content are different operations, which are not dependent on each other — you may render the list of archive contents without extracting the files, and vice versa.
Also technically step #2 is not necessary — if you know the exact full name (this includes its relative path) of the desired file to extract, there is no need to get a list of all attachments, because the instance of the Attachment class can be created manually and passed directly to the Viewer.SaveAttachment() method.
Code example below shows all the described operations with the attachments.
using GroupDocs.Viewer;
using GroupDocs.Viewer.Options;
using GroupDocs.Viewer.Results;
// ...

using (Viewer viewer = new Viewer("Archive.zip"))
{
    IList<Attachment> allAttachments = viewer.GetAttachments();

    //Iterate over all attachments and save them
    foreach (Attachment attachment in allAttachments)
    {
        Console.WriteLine("- {0} - {1} - {2} bytes", attachment.FilePath, attachment.FileType, attachment.Size);
		MemoryStream destination = new MemoryStream();
        viewer.SaveAttachment(attachment, destination);
    }

    //Create one Attachment manually and save it
    Attachment oneAttachment = new Attachment("/Images/PNG/Watermark.png", "/Images/PNG/Watermark.png");
    using (FileStream extractedFile = File.Create("Watermark.png"))
    {
        viewer.SaveAttachment(oneAttachment, extractedFile);
    }
}
Imports GroupDocs.Viewer
Imports GroupDocs.Viewer.Options
Imports GroupDocs.Viewer.Results
' ...

Using viewer As New Viewer("Archive.zip")
    Dim allAttachments As IList(Of Attachment) = viewer.GetAttachments()

    'Iterate over all attachments and save them
    For Each attachment As Attachment In allAttachments
        Console.WriteLine("- {0} - {1} - {2} bytes", attachment.FilePath, attachment.FileType, attachment.Size)
        Dim destination As MemoryStream = New MemoryStream()
        viewer.SaveAttachment(attachment, destination)
    Next attachment

    'Create one Attachment manually and save it
    Dim oneAttachment As Attachment = New Attachment("/Images/PNG/Watermark.png", "/Images/PNG/Watermark.png")
    Using extractedFile As FileStream = File.Create("Watermark.png")
        viewer.SaveAttachment(oneAttachment, extractedFile)
    End Using
End Using
Like for all other supported formats, the GroupDocs.Viewer supports getting the view info for the archive documents. This means that for the loaded archive a GroupDocs.Viewer can grab metadata like exact format, whether or not it is password-protected, list of folders inside archive, and a number of pages, which the GroupDcos.Viewer will produce in case when rendering to PDF, PNG, or JPEG will be selected. More info about retrieving the document information in general may be found in the corresponding article.
In order to retrieve metadata about specific archive, the Viewer.GetViewInfo() method must be called. This method obtains an instance of ViewInfoOptions class, which can be created from its own or from existing view options. The GroupDocs.Viewer constructs the metadata about the archive in accordance to the passed ViewInfoOptions and its specific settings. For example, for the HTML-based info options the number of returned Pages is always “1” (because the displaying to the HTML format is pageless), while for the PDF, PNG and JPEG there will be some specific page number depending on count of files and folders within the archive.
In the context of archives the Viewer.GetViewInfo() method returns an instance of the ArchiveViewInfo class, which is the direct inheritor of the ViewInfo class. Except for the properties present in the ViewInfo, the ArchiveViewInfo provides a Folders property of List<System.String> type — it contains a list of all folders, stored in the archive. Please note that the GroupDocs.Viewer creates a new List with folder names every time when method Viewer.GetViewInfo() is called. Also ArchiveViewInfo.Folders property does not take into account the value of the ArchiveOptions.Folder property, even if ViewInfoOptions was created from such an option — so ArchiveViewInfo.Folders always returns a complete list of folders inside the archive.
Concluding: to get the ArchiveViewInfo, just load the archive document to the Viewer constructor, create a relevant ViewInfoOptions, call the Viewer.GetViewInfo() and cast the returned ViewInfo instance to the ArchiveViewInfo type.
Code sample below demonstrates all the described information.
using GroupDocs.Viewer;
using GroupDocs.Viewer.Options;
using GroupDocs.Viewer.Results;
// ...

ViewInfoOptions viewInfoOptions = ViewInfoOptions.ForPdfView();

using (Viewer viewer = new Viewer("Archive.zip"))
{
    GroupDocs.Viewer.Results.FileInfo fileInfo = viewer.GetFileInfo();
    Console.WriteLine("Encrypted: {0}", fileInfo.Encrypted ? "yes" : "no");

    ArchiveViewInfo viewInfo = (ArchiveViewInfo)viewer.GetViewInfo(viewInfoOptions);

    Console.WriteLine("Archive format: {0}", viewInfo.FileType);
    Console.WriteLine("Number of pages when saving to PDF: {0}", viewInfo.Pages.Count);

    Console.WriteLine("List of all pages with their metadata, when rendering to PDF:");
    foreach (Page page in viewInfo.Pages)
    {
        Console.WriteLine(" - Page #{0} - {1}x{2}px", page.Number, page.Width, page.Height);
    }

    Console.WriteLine("List of folders in the archive document:");
    foreach (string folder in viewInfo.Folders)
    {
        Console.WriteLine(" - {0}", folder);
    }
}
Imports GroupDocs.Viewer
Imports GroupDocs.Viewer.Options
Imports GroupDocs.Viewer.Results
' ...

Dim viewInfoOptions As ViewInfoOptions = ViewInfoOptions.ForPdfView()

Using viewer As New Viewer("Archive.zip")
    Dim fileInfo As GroupDocs.Viewer.Results.FileInfo = viewer.GetFileInfo()
    Console.WriteLine("Encrypted: {0}", If(fileInfo.Encrypted, "yes", "no"))

    Dim viewInfo As ArchiveViewInfo = DirectCast(viewer.GetViewInfo(viewInfoOptions), ArchiveViewInfo)

    Console.WriteLine("Archive format: {0}", viewInfo.FileType)
    Console.WriteLine("Number of pages when saving to PDF: {0}", viewInfo.Pages.Count)

    Console.WriteLine("List of all pages with their metadata, when rendering to PDF:")
    For Each page As Page In viewInfo.Pages
        Console.WriteLine(" - Page #{0} - {1}x{2}px", page.Number, page.Width, page.Height)
    Next page

    Console.WriteLine("List of folders in the archive document:")
    For Each folder As String In viewInfo.Folders
        Console.WriteLine(" - {0}", folder)
    Next folder
End Using
Despite the new archive processing module being introduced in the GroupDocs.Viewer version 24.10, it is consequentially and constantly improved with new features and enhancements.
First of all, we constantly add support for new archive formats. In the version 25.1 a support of LHA/LZH archive format was added. In the version 25.2 a support of Cabinet (CAB) archive format was added, and in the version 25.3 — support of Windows Imaging (WIM) format.
Also the version 25.2 has introduced an improvement — now the last modification date is shown also for the entries of CAB, ISO, and TAR archives.
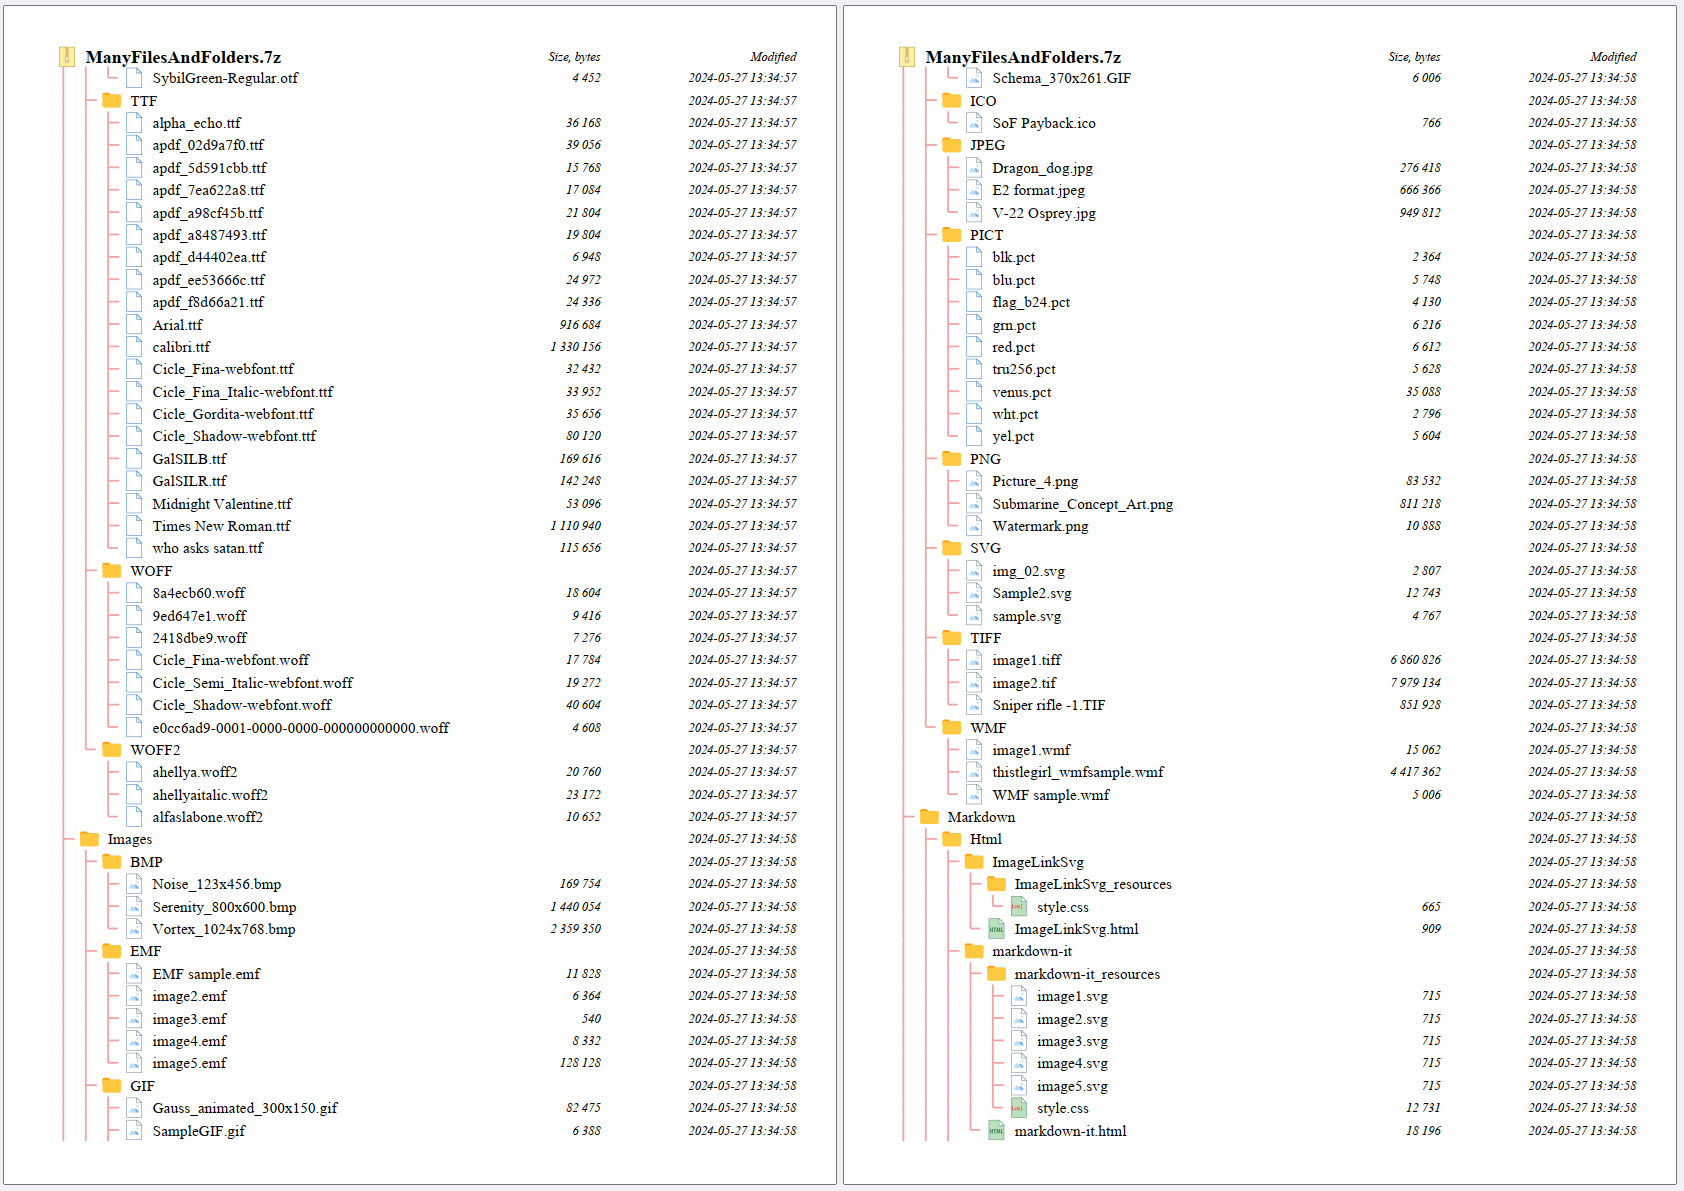
But the most significant emerging feature was presented in the version 25.3 — starting from this version the GroupDocs.Viewer supports listing content of the nested archives — archives inside archives, — and this nesting level is indefinite. This means that one archive file may contain another, inner, and this inner contains other sub-inner archives, and so on… if these sub-archives are not password-protected, then the GroupDocs.Viewer will open them and explore their content. Screenshot below shows such a sample archive, rendered with the GroupDocs.Viewer.

Sample file “all-formats.zip”, shown on a screenshot, actually has no folders “sample.tar” and “sample.zip” — they are actually files, inner archives inside outer archive. But GroupDocs.Viewer has opened and listed their content and thus displayed them as the folders. Need to mention that rendering nested archives does not require any additional actions or tuning in the public API — it is enabled by default.
Before the version 24.10 the archive documents were supported by the GroupDocs.Viewer in a specific way, without showing the tree hierarchy, only with a paged view, showing only one folder at a page. Performance was also not so good as it could be, especially on big archives.
Starting from the version 24.10, the completely new archive processing mechanism has completely replaced the old one. Now the list of contents of archives is rendered as archive entries are actually stored, in tree-like pageless view, where separation on pages are done only for paged formats like PDF, PNG, and JPEG, and now this page splitting is not dependent on specific folders. Performance was also drastically improved, especially while rendering archives to HTML.
This new archive processing mechanism is constantly improved from version to version with the new bugfixes, features and enhancements.
Was this page helpful?
Any additional feedback you'd like to share with us?
Please tell us how we can improve this page.
Thank you for your feedback!
We value your opinion. Your feedback will help us improve our documentation.

