Pdf Digitally signing Leave feedback
On this page
GroupDocs.Signature provides DigitalSignOptions class to specify different amount of settings for Digital signature
- digital certificate (file on local disk CertificateFilePath or stream CertificateStream) (required)
- password of digital certificate Password (required)
- digital signature details (Reason, Contact, Location)
- signature image as digital signature appearance on document page (ImageFilePath or ImageStream)
- image signature appearance on document page (Alignment, Margin etc.)
Here are the steps to add Digital signature into document with GroupDocs.Signature:
- Create new instance of Signature class and pass source document path as a constructor parameter.
- Instantiate the DigitalSignOptions object with required certificate and its password.
- Call Sign method of Signature class instance and pass DigitalSignOptions to it.
- Analyze SignResult result to check newly created signatures if needed.
This example shows how to add Digital signature to document. See SignResult
using (Signature signature = new Signature("sample.pdf"))
{
    // initialize digital option with certificate file path
    DigitalSignOptions options = new DigitalSignOptions("certificate.pfx")
    {
        // certifiate password
        Password = "1234567890",
        // digital certificate details
        Reason = "Sign",
        Contact = "JohnSmith",
        Location = "Office1",
        // image as digital certificate appearance on document pages
        ImageFilePath = "sample.jpg",
        //
        AllPages = true,
        Width = 80,
        Height = 60,
        VerticalAlignment = VerticalAlignment.Bottom,
        HorizontalAlignment = HorizontalAlignment.Right,
        Margin = new Padding() {  Bottom = 10, Right = 10},
    };
    signature.Sign("signed.pdf", options);
}
Starting with GroupDocs.Signature for .NET 26.9, PDF digital signatures use SHA-256 by default, in the adbe.pkcs7.detached format. Set the HashAlgorithm property to use SHA-384 or SHA-512 instead:
using (Signature signature = new Signature("sample.pdf"))
{
    DigitalSignOptions options = new DigitalSignOptions("certificate.pfx")
    {
        Password = "1234567890",
        // SHA-256 is the default. SHA-384 and SHA-512 are also available.
        HashAlgorithm = HashAlgorithm.Sha512
    };
    signature.Sign("signed.pdf", options);
}
A time stamp, when you add one, uses the same digest. HashAlgorithm.Sha1 is still available for legacy validators, but it is not suitable for new signatures and many validators reject it. See Digital signing with custom hash for all values.
A certificate is valid from its NotBefore date to its NotAfter date, and validators report a signature made outside that period as not valid. So, starting with GroupDocs.Signature for .NET 26.9, the Sign method does not sign with such a certificate by default: it throws GroupDocsSignatureException, and nothing is signed or saved. The message names the certificate and the property that allows it:
The signing certificate expired on 2019-05-01 12:00 UTC (subject "CN=...", thumbprint ...). Validators report a signature made with an expired certificate as not valid, so the document is not signed. To sign anyway, set DigitalSignOptions.AllowExpired to true.
To sign anyway, for example to test with an old certificate, set the property for the case you need. The document is then signed, and a warning is written to the logger set in SignatureSettings:
using (Signature signature = new Signature("sample.pdf", new SignatureSettings(new ConsoleLogger())))
{
    DigitalSignOptions options = new DigitalSignOptions("certificate.pfx")
    {
        Password = "1234567890",
        // Sign even though the certificate has expired. A warning is written to the logger.
        AllowExpired = true
    };
    signature.Sign("signed.pdf", options);
}
| Property | Default | Allows |
|---|---|---|
AllowExpired | false | a certificate whose validity period has ended |
AllowNotYetValid | false | a certificate whose validity period has not started yet. This usually means the certificate was issued for a later date, or the computer’s clock is wrong |
The two properties are independent: AllowExpired does not allow a certificate that is not valid yet. Also note:
- The certificate is compared with the current time in UTC, not with
DigitalSignature.SignTime. - The check covers a certificate given as a file, a stream or a
DigitalSignature.Certificateobject, in every document format. - For spreadsheets it also covers the certificate of the first
DigitalVBAextension, and the same two properties govern it. WithDigitalVBA.SignOnlyVBAProjectthe spreadsheet itself is not signed, so its own certificate is not checked. - Digital signatures of images use no certificate and are not checked.
- A certificate that cannot be read, for example because of a wrong password, gives its own error.
What is Long-Term Validation (LTV) for Digital Signatures?
Long-Term Validation (LTV) is a method used to ensure the continued validity of digital signatures over time, even after the signing certificate expires or is revoked. LTV embeds additional information within the signed document, such as the certificate’s revocation status, timestamp, and the certificate chain, which allows anyone verifying the signature in the future to determine its authenticity, even if the original certificate is no longer available.
Why is LTV Important?
Digital signatures rely on certificates, which have expiration dates. Once the signing certificate expires or is revoked, the signature may no longer be considered valid. However, many legal, financial, and regulatory scenarios require documents to remain valid for years or decades. LTV solves this problem by embedding validation data directly into the signed document, ensuring that the signature’s authenticity can be verified at any point in the future.
Here is an example of how to implement Long-Term Validation (LTV) for a PDF document using GroupDocs.Signature:
using (Signature signature = new Signature("sample.pdf"))
{
    // initialize digital option with certificate file path
    DigitalSignOptions options = new DigitalSignOptions("certificate.pfx")
    {
        // certifiate password
        Password = "1234567890",
        // digital certificate details
        Reason = "Sign",
        Contact = "JohnSmith",
        Location = "Office1",
        AllPages = true,
        Width = 80,
        Height = 60,
        VerticalAlignment = VerticalAlignment.Bottom,
        HorizontalAlignment = HorizontalAlignment.Right,
        Margin = new Padding() {Bottom = 10, Right = 10},

        // Enable Long-Term Validation (LTV) to ensure signature validity over time
        UseLtv = true
    };
    signature.Sign("signed.pdf", options);
}
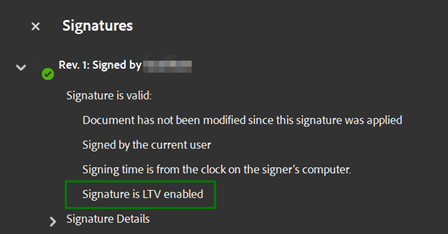
After signing a document with LTV support, you can check whether the signature includes LTV data using Adobe Acrobat.
Here is the example of signature detailes in Adobe Acrobat:
NoteThe validation data that can be embedded depends on your signing certificate. While it saves the document, GroupDocs.Signature collects revocation information from the OCSP or CRL addresses that the certificate authority publishes in the certificates, so those addresses must be reachable from the signing machine at signing time. A certificate whose authority publishes neither cannot produce complete validation data. See Network access and data privacy.
You may easily run the code above and see the feature in action in our GitHub examples:
- GroupDocs.Signature for .NET examples, plugins, and showcase
- GroupDocs.Signature for Java examples, plugins, and showcase
- Document Signature for .NET MVC UI Example
- Document Signature for .NET App WebForms UI Example
- Document Signature for Java App Dropwizard UI Example
- Document Signature for Java Spring UI Example
Along with the full-featured .NET library, we provide simple but powerful free online apps.
To sign PDF, Word, Excel, PowerPoint, and other documents you can use the online apps from the GroupDocs.Signature App Product Family.
Was this page helpful?
Any additional feedback you'd like to share with us?
Please tell us how we can improve this page.
Thank you for your feedback!
We value your opinion. Your feedback will help us improve our documentation.